
There is also the case of installing Visual Studio 2015 and finding that your previously installed Android virtual machines under Android Virtual Device manager (AVD Manager) no longer works because HAXM will not load. I covered that here: Intel, Android Emulator, Hyper-V and HAXM. What's going on?
Not only does it cause the above problem, Visual Studio 2015 itself does not work "out of the box" for the C++ Android openGL ES project and it is something I talked about here: "Microsoft And Google: When Worlds Collide"
The typical symptoms of Visual Studio not working are:
- Everything else non Android works.
- Android cross platform VC++ project for openGLES creates the Project OK
- Above project does not compile.
- You get Error from Ant saying it exited with some code.
- You get an error saying CLang.exe could not be located.
- Your Visual Studio Emulator does not launch. May complain about not able to connect to UDP.
First un-install Visual Studio 2015 and all its components. The easiest way is to use "TotalUnInstaller" provided by Microsoft on Git to do it for you. Be aware that this tool will remove "other" visual studio editions listed in its documentation as well.
First download and install the Java JDK. Ant needs tools.jar from it and the latest version at time of this writing is "JDK 8U92" can be installed on any drive with the tools.jar still getting installed.
Which brings me to the point of why not let Visual studio installer install it?
VS2015 installer lists an older version of java and installs it on your C: drive. In the age of expensive SSD's you normally want things installed on your data drive instead. Even the Android SDK and NDK from within Visual Studio is installed on the C: drive and any consequent images you create(which will be fairly large) will go on your C drive. Given that, we have now covered that you should download and install Java JDK yourself.
Next is to un-install Hyper V through control panel/programs and features/"turn windows features on or off". Just un-tick the Hyper V, your PC will need to reboot after it has finished uninstalling Hyper-V.
I am covering INTeL CPU's because that is what I have and thus there is a good reason for doing the above step. You will download and install the Android SDK but that will fail to install the Android Virtual machine as a result of Hyper-V being on. It relies on HAXM which Hyper-V interferes with so HAXM will not install. You should create a Android Emulator and make sure it works before proceeding. If it does not work, you need to sort that out first! Also note that HAXM will not necessarily be installed by default so you will need to go to the SDK directory and start SDK Manager. You can install HAXM from here.

To see the screen above, you will need to download and install Android Studio. Once installed, go to the folder you installed the SDK and launch "SDK Manager".
Select and install HAXM.
Seperately from the SDK, download and install the Android NDK.
You can now start Android Studio and then once you have tested that Android studio works, Re-install Hyper V through the same process as uninstalling it, except this time tick the Hyper-V checkbox. you will need to reboot your system.
Install ANT. which at time of writing was up to 1.9.7.
DO NOT launch Android Studio or Android Emulator after reboot.
Install Visual Studio with all the cross platform option and sub options under that checked. This includes Android development kits.
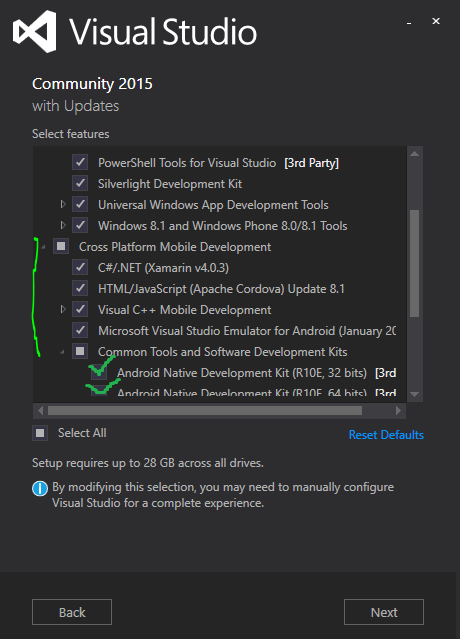
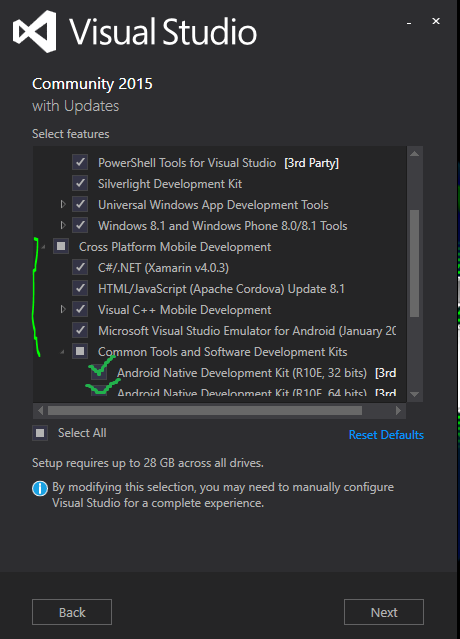

You can install VS in any drive but a fair few files will still be installed on your C drive including the Android SDK. You can remove the Android SDK from VS later but at the moment we are installing it so that if you cannot get it working with the separately installed SDK, you can fall back to using the VS one.
Once Visual studio has intalled, start a VC++ Cross platform project and choose the Android and IOS only option for openGL ES app. SET the debug platform to x86. Do a "Rebuild" on the "[yourappname].Android.Packaging" project (right click, rebuild). If you do not see errors, and rebuild succeeds, you don't need this fix as your one works great out of box. However you are likely to see errors such as "Ant exited with Code 1" or "Unable to locate CLang.exe".
Exit VS and start it up again but remain at the landing page. Click Tools and options. We will now set the Environment paths. Note that you do not have to set this from Windows System option.

Note that While in the above screenshot I am only changing the path to the Android NDK. In actuality, before the screenshot, I changed the other two as well!
Once done, it should look like the screenshot below:
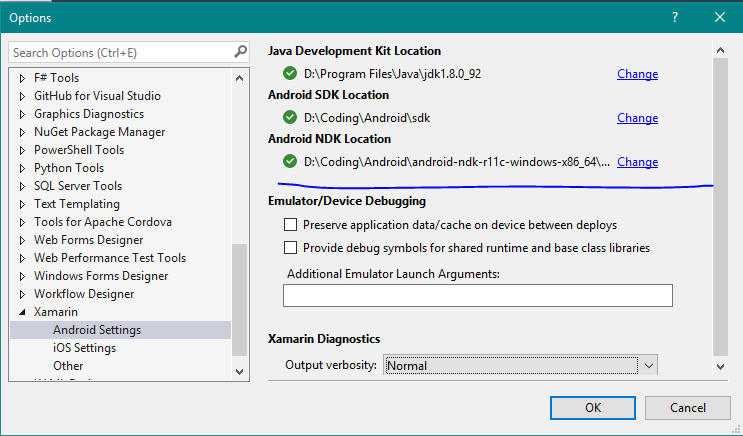
Although I am showing this for the VC++ project, this will fix this for the Xamarin projects running under C# but I thought to show you this since we are in the same screen.
What we actually need to fix now is the paths for VC++ and the Apache Cordova Android SDK paths.

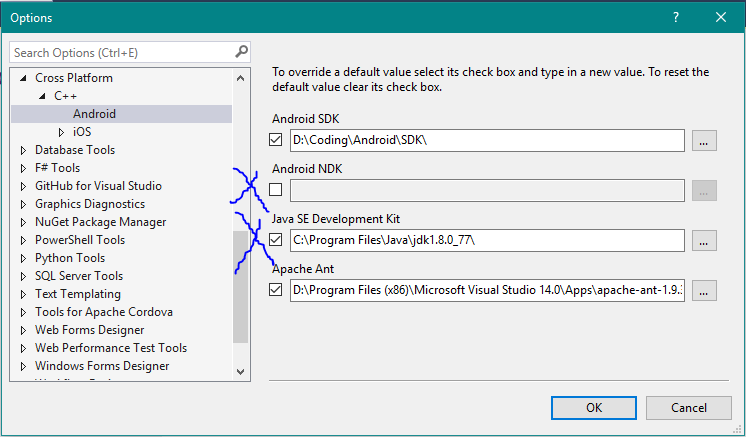
As in the screenshot above, it is found in the branch "Tools for Apache Cordova" and selecting "Environment Variable Overrides"
Fix the ones here so they point to where you have, previously, installed ANT, Android SDK, and Java. The blue X's mark an example of what VS shows if it cannot find your kit.
We now need to fix the Cross platform paths for VC++. Expand the branch for "Cross Platform Tools", then "C++", and finally "Android" as shown in screenshot below:
Change all the paths in the screenshot above as needed. The blue X's mark items of particular interest. Firstly the Android NDK is grayed out because VS is using the default one. Place a tick in the checkbox and choose the path where you installed the NDK from earlier. Similarly the Java path is pointing to the old version VS installed so you need to change this to the version you installed earlier.
Next, open the project you created earlier, and Rebuild. If it still gives an error regarding ANT then you may need to manually change the Android Manifest file. You will need to change the Version to the SDK Version you have installed through the SDK Manager. Such as version 19 -which is what I am using.

Change the version appropriately as in the above screenshot marked with arrow and underline.
For the heads up on this being the SDK version not the target version, thanks go to Robert Donaldson. Hours of madness solved in a minute, thanks Robert!
The project should successfully rebuild now. If it fails, you may not have the latest Visual Studio Apache Cordova update. In this case look at your VS notifications and it should be listed there as an update (the purple flag on the top right of your Visual Studio Window). Install the update and re-launch your project. It should build then.
Next step is to create the Visual Studio emulator so that you can run your application; which by default is the spinning cube.

In the above screenshot, you can see I have some emulators already created. Yours will be blank so you need to click on "Visual Studio Emulator for Android...". That will launch the Visual Studio Android Emulator Screen where you can download an "Image" and then run that. I wont go into explaining this as once you see that screen, you will see it is fairly intuitive.
Once everything is ready and the Android emulator is running, you should see a spinning cube displayed like the video below! I have made some changes to the original cube and background:
One more thing to note, you will not be able to use AVD that came with Android Studio while Hyper-V is on. You will have to un-install Hyper-V and reboot. Similarly you need to activate Hyper-V and reboot to use Visual Studio android emulator. You can create a hardware profile for your windows to switch between the two but currently there is no other solution for that.
Thanks and hope you get everything working as I did!
Don't forget to leave comments, suggestions and tips to help me and others along the Android Development adventure!
No comments :
Post a Comment